

Yoga is a widely practiced Hindu spiritual and severe discipline, a part of which includes breath control, simple meditation, and the adoption of different body postures all. In order to keep this practice going without becoming obsolete, one must learn new areas or poses to aid better balance. Practitioners of every level can profit from going back to basics regularly to review the actions and alignment of standard standing poses, backbends, forward bends, and inversions. So without further delay, below is a list of top 5 yoga poses that you can do at home along with focus tips for the beginner, intermediate, and advanced practitioners.
1. Garland Pose
Malasana
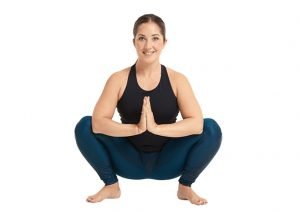
This beautiful squat is one of our beloved poses. The Malasana pose releases the lower back, opens the hips, and turns the yogi into a ‘cute little nugget’. Tips on how to make this pose easier or how to go deeper in this pose include:
Beginner
It’s usual for beginners to encounter difficulties when dropping their heels to the ground. Ensure to spin your heels in and toes out, as well as widen your stance. If it is inconvenient for your knees to drop into a full squat, sit on one or more blocks.
Intermediate
Step up the hip-opening portion of this posture by including your arms. Lean forward to wriggle your upper arms into the inside of your legs. Then draw your palms together in front of your heart and push your heart into your thumbs. This action will naturally facilitate external rotation and give you that extra wonderful ‘ahhhh’ moment.
Advanced
Complete Malasana is customarily performed with the feet together, knees wide, and the torso in an advancing fold with either the arms extending or enclosed behind the heels. Classically, you will see this pose done with feet wider than the hips.
2. Four-Limbed Staff Pose
Chaturanga Dandasana
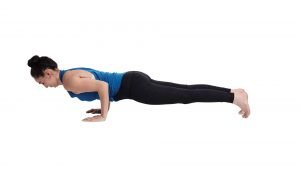
The Chaturanga pose is one of the most common postures in Vinyasa yoga and also one of the most abused. Learners tend to rush this pose, cheating its alignment in the process, repetition of which can lead to injury. Check out these tips to revisit this introductory posture and begin practicing it as its own pose rather than an alteration.
Beginner
Many people don’t have the rigor and/or body mindfulness to execute this position with good alignment. It is endorsed that most beginners learn this pose with their knees down. Concentrate on drawing the lower belly up to avert dumping in the lower back. Also, keep your elbows tight to your rib cage and stacked above your wrists.
Intermediate
Intermediates should endeavor to have the eye of the tiger! I.e. gaze forward the whole time to avoid rounding in the upper back (people tend to always want to look down here when it is more important to look forward!) Draw the shoulders back and concentrate on outspreading your heart as you go lower so the elbows stay over the wrists rather than falling behind the heels of your hands.
Advanced
Strive to use full breath! People enjoy flying through this pose. Exercise a full inhale in followed by a full exhale to launch into the Chaturanga pose while endeavoring not to transition out of it until your exhale is complete. This process takes control, awareness, and prevents you from making trivial slip-ups and moving too quickly.
3. Extended Triangle Pose
Utthita Trikonasana
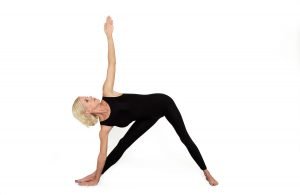
The Trikonasana pose is such a classic standing pose! We live in a world where standing poses in yoga are often ignored as they are deemed ineffective, but this one is part of a good practitioner’s regular practice come rain or shine. It is a wonderful way to release your lower back, strengthen your core, and develop your body (and mind).
Beginner
Beginners tend to collapse their lower body trying to get their hand or palm to the ground. This pose is achieved by skipping that step and placing your palm either on a block outside of your shin or on your shin below your knee. This permits you to even out through both sides of your ribcage, creating even length in the chest area of your body.
Intermediate
It’s so easy to get full of life in this pose as most people stick out their butts and puff their ribs. Focus on corseting your ribcage in and keeping your lower belly engaged and lifted to create space in your lower back.
Advanced
The advanced step involves taking both of these tips and looking down. The aim is to line your torso up with your front leg. If you practice just enough, you can keep both sides of your waist even, ribs in, belly engaged, and lower back long as you lean back.
4. Crescent Pose aka High Lunge
A yoga practice without this perfect standing pose is practically unimaginable. The Crescent Lunge pose is the go-to for the opening of hips and psoas, encouraging space in the chest, and feeling dominant on the feet.
Beginner
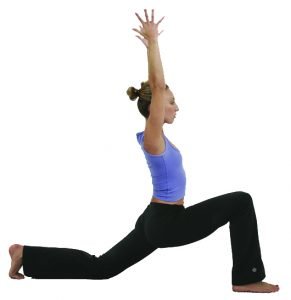
It is normal to see newer students struggling for balance in this pose. This has an easy fix – looking down! Odds are your feet are too narrow, so make sure your front and back foot are hip-width apart. This will widen the position and allow you to be stable.
Intermediate
There’s a tendency to lean progressively in this pose which is often caused by pitching in your lower back or tension in the psoas connected to your back leg. Try bending your back knee as much as you need to for mobility in your pelvis. Draw the front crest of your pelvis up to neutral and gradually draw your back leg towards being straight. It may not fully straighten, but this is a stronger posture nevertheless.
Advanced
Try accumulating the constituents of a backbend/drop back in your upper body. Follow the rules provided above and then reach your arms overhead, interlocking all the fingers except for your thumb and index. Keep the base of the neck unperturbed as you lift your heart up and curl your upper chest. Draw an imaginary line along the ceiling going up and back, and be sure to keep the base of your building strong, i.e. don’t pitch your pelvis.
5. Revolved Chair Pose
Parivrtta Utkatasana
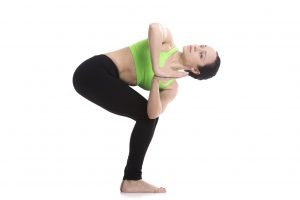
The chair pose isn’t the most popular pose in the world, and that’s exactly why it’s on the list. It’s a great initial pose to teach us how to twist without harm. If you can successfully learn the mechanics of a twist here, you’ll be safer in more advanced postures.
Beginner
Monitor your knees and make sure they stay even as the best clue comes from your knees if you want to keep your lower back even. So if you have one popping out, draw it back in! This will counteract your lower back and keep you safe.
Intermediate
Draw your palms into a salutation seal and press them into each other, so much that your torso revolves and your heart lifts up to meet your thumbs.
Advanced
Reach your bottom hand down to the outside of your foot and spread the top arm back up. Integrate the work of keeping your knees/hips level and using your outer arm to push into your leg to get the stunning turn in your chest.
Source: Read Full Article